
I spent two seasons staring at my tiny balcony and wishing I could grow something real. No yard. No big planters. Just a narrow strip of concrete and a stubborn hope for fresh herbs and tomatoes. That is when I decided to try a balcony raised garden bed.
Honestly? I almost talked myself out of it three times. Weight limits. Drainage. Landlord rules. All of it felt like a setup for failure. Then I stopped overthinking and started with one small elevated box.
What happened next changed how I use that outdoor space every single day.
Why a Balcony Raised Garden Bed Made Sense for Me
I used to think raised beds belonged only in suburban backyards. Big wooden frames. Heavy soil. Lots of room. My balcony had none of that.
See, the real problem was not the lack of ground. It was the lack of height and structure. Regular pots dried out fast. They tipped over in wind. And I kept forgetting which one needed water. A raised bed solved those headaches by giving me one contained growing space at a comfortable height.
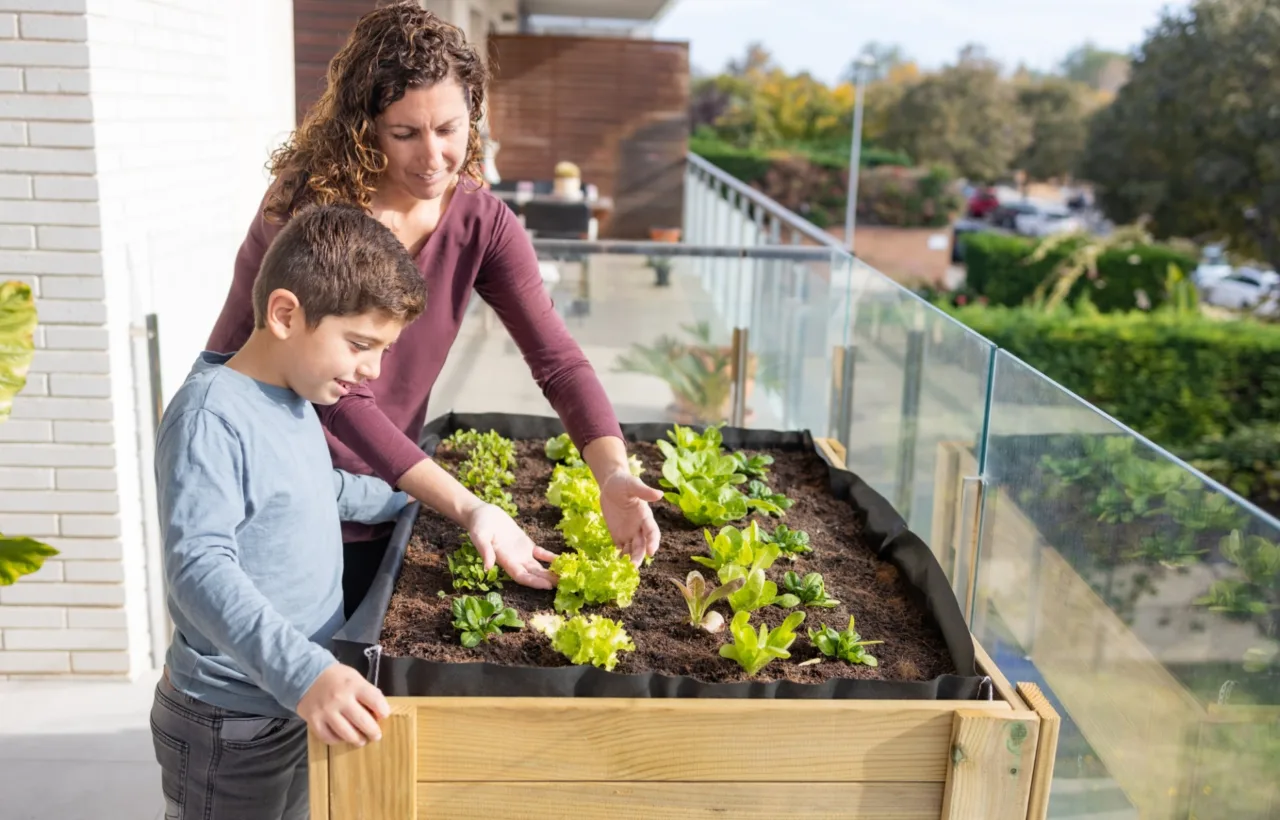
I chose an elevated style on legs. That kept the soil volume lower than a ground-level bed. It also let me reach everything without kneeling on concrete. Bonus: the space underneath became storage for tools and extra bags of mix.
The biggest win came later. I finally grew lettuce that tasted better than store-bought. And I did it without a single yard.
Checking the Weight Before Anything Else
Do not skip this step. I nearly did.
Wet soil is heavy. A full box of damp potting mix plus plants can add hundreds of pounds. My building has older balconies. I emailed the property manager and asked about the load rating.
They confirmed the continuous load limit. Then I calculated roughly. I kept my first bed under 150 pounds when full. I used lighter mix and a smaller footprint.
If you rent, talk to the landlord early. Some buildings ban anything that can drip. Others just want notice. I placed a waterproof mat underneath and that kept the neighbors happy.
A raised bed table or elevated planter works better than a ground-hugging box for most balconies. Less soil means less weight. You still get the raised height that makes gardening easier on the back.
Keep the heaviest portion near the balcony wall rather than the outer edge, and include the bed, plants, water, and stored tools in your load estimate.
Choosing Materials That Last Outside
I tested three options over time.
Wood looks the most natural. Cedar and redwood resist rot better than pine. I built one simple frame from untreated cedar boards. It held up two full seasons with only minor fading. Avoid any wood treated with chemicals if you plan to grow food. Old pallets can leach stuff you do not want near edible plants.
Metal feels modern and lasts longer in rain. Galvanized or powder-coated steel stays solid. Some models include a drain plug at the bottom. That feature saved me during heavy summer storms. Rounded edges help if kids or pets share the space.
Plastic or resin wins on weight and price. The ones I tried stayed light even when full. They do not rot. They do not rust. Some look surprisingly decent if you pick a neutral color. I keep one resin elevated bed for herbs because I can move it alone when the sun shifts.
Wheels make a difference. My second bed has locking casters. I roll it to the sunnier corner in spring and pull it back under partial cover during the hottest weeks.
Choose casters rated for the planter’s fully saturated weight, not its empty weight, and lock them before watering or harvesting.
DIY Versus Buying Ready-Made
I started with a store-bought elevated planter. Assembly took twenty minutes. Drainage holes already existed. Height felt perfect.
Later I built a smaller DIY version for the other side of the balcony. Wooden crates lined with burlap. Hot glue. Soil. Plants. Total cost stayed under ten dollars each. They looked rustic and worked fine for shallow-rooted herbs.
DIY gives you control over size. Bought beds give you sturdier legs and better drainage systems. I use both now. The store one holds tomatoes and peppers. The homemade ones hold basil, parsley, and chives.
Measure first. Walk the length of your railing. Leave space to walk past the bed. Leave space for a small chair if you like sitting out there. A bed that fills the entire width turns the balcony into an obstacle course.
How I Layered the Soil for Better Results
Dumping bagged mix straight in works. It just does not work as well.
I follow a simple layer system even in shallow elevated beds.
- Bottom layer: coarse material for drainage. Broken pottery, small pebbles, or woody prunings.
- Middle layer: a bit of unfinished compost or leaf mold if I have it.
- Top layers: quality potting mix mixed with finished compost.
The drainage layer prevents water from pooling around the roots. The compost keeps feeding the plants slowly. I skip heavy garden soil. It packs down and holds too much water on a balcony.
I line wooden beds with landscape fabric before adding anything. Plastic sheeting can work but fabric drains better. Place the empty bed in its final spot before you fill it. Once it is full, moving it becomes a two-person job or worse.
In shallow containers, gravel can reduce usable root depth without improving drainage; prioritize drainage holes and a lightweight, airy potting mix instead.
What Actually Grew Well for Me
Sunlight decides almost everything. My balcony faces southeast. It gets solid morning light and some afternoon shade. That pattern suits many vegetables.
I had the best luck with:
- Leafy greens: lettuce, spinach, Swiss chard
- Herbs: basil, parsley, mint (keep mint contained), chives
- Root crops in deeper beds: radishes, baby carrots, green onions
- Compact tomatoes and peppers when I gave them a deeper box and a stake
I planted taller things toward the back or center so they did not shade the low growers. Climbing beans needed a simple trellis attached to the railing. Pumpkins and full-size squash took too much space and weight. I left those for people with actual yards.
Start small. One bed with three or four types of plants teaches you more than a crowded setup that fails.
Resow lettuce, spinach, radishes, and green onions every two weeks, so one southeast-facing bed supplies staggered harvests instead of one large glut.
Daily Care That Does Not Feel Like a Chore
Watering is the part I used to mess up. Elevated beds dry faster than ground beds. I check the soil with a finger every morning during hot spells. When the top inch feels dry, I water deeply until a little runs out the bottom.
A simple drip tray or mat underneath catches the overflow. That protects the balcony surface and keeps the people below dry.
Fertilizer stays light. I mix a slow-release organic option into the soil at planting time. Then I side-dress with compost tea every few weeks. Overfeeding burns roots in confined spaces.
Pests showed up less than I expected. A few aphids on the kale. I sprayed them off with a strong stream of water. Companion planting helped. Basil next to tomatoes seemed to keep some bugs away. I still check the undersides of leaves once a week.
Add a thin mulch layer around shallow-rooted greens during hot spells to slow evaporation, while keeping mulch away from stems to reduce rot.
Mistakes I Made So You Can Skip Them
I filled the first bed while it sat in the wrong corner. Moving it later felt impossible. Lesson learned: position empty, then fill.
I used cheap potting soil that compacted into a brick. Plants struggled. Better mix costs a few dollars more and pays off fast.
I ignored the weight of the water itself after a heavy rain. One storm left the bed much heavier overnight. Now I make sure the drainage stays clear and I empty the catch tray promptly.
I crowded too many plants the first season. Everything competed. Yield dropped. Spacing according to the seed packet labels works better than trying to maximize every square inch.
Frequently Asked Questions
How deep does a balcony raised garden bed need to be? Most herbs and leafy greens do fine in 8 to 12 inches of soil. Root vegetables and tomatoes prefer closer to 12 inches or more. I keep mine between those numbers and get solid results.
Will a balcony raised garden bed damage my railing or floor? Not if you protect the surface and stay under the weight limit. Use a waterproof mat and check drainage regularly. I have had zero issues after three seasons.
Can I grow enough food to actually matter? Yes for herbs, salad greens, and a handful of tomatoes or peppers. You will not feed a family of four year-round. You will add real flavor and satisfaction to a lot of meals. That matters to me.
Do I need special soil for a balcony setup? Regular garden dirt is too heavy and drains poorly. Stick with potting mix blended with compost. It stays lighter and roots stay healthier.
What if my balcony gets limited sun? Choose plants that tolerate partial shade. Leafy greens and many herbs still produce. I move my wheeled bed to chase the best light when needed.
Final Thoughts From My Own Balcony
I still catch myself walking out there just to look at the plants. The raised bed turned a neglected concrete strip into the most used part of my apartment.
Start with one modest elevated planter. Check the weight rules. Pick materials that match your climate and budget. Layer the soil with drainage in mind. Plant what fits the light you actually have.
Then water, watch, and adjust. The first harvest of your own lettuce or basil tastes better than anything from a plastic clamshell.
I keep expanding slowly. One more bed this year for extra herbs. Maybe a second tomato plant. The point is not perfection. The point is growing something real in the space you have.
Go measure your balcony this weekend. Pick a spot. Start small. Your future self will thank you every time you snip fresh leaves for dinner.